[ENG/ESP] How to make a keychain with my initial. Letter Y./Cómo hacer un llavero con mi inicial. Letra Y.

| How to make a keychain with my initial. Letter Y. | Cómo hacer un llavero con mi inicial. Letra Y. |
|---|---|
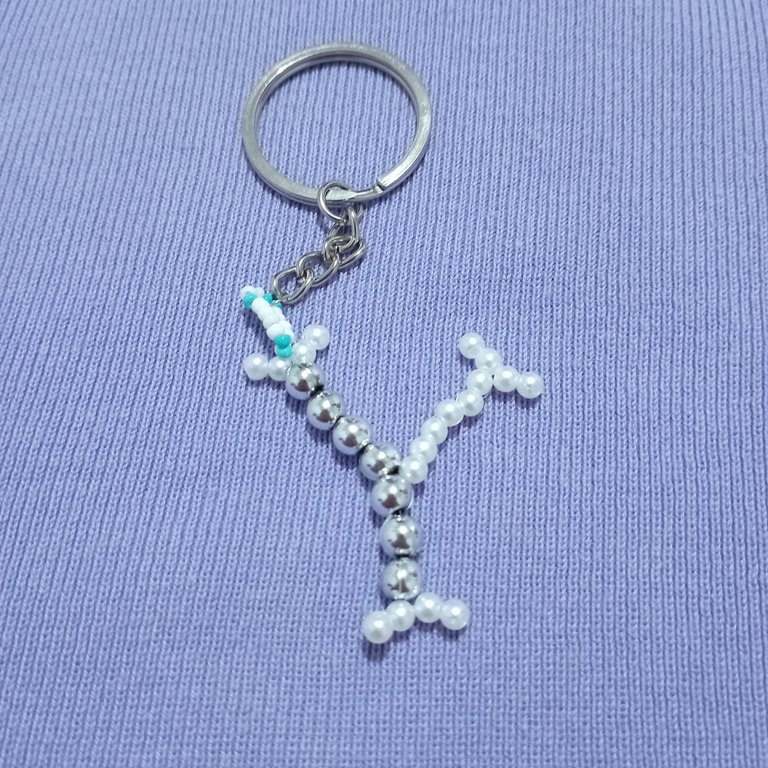
Greetings dear friends. Blessed new year to all. My heart's desire is that this year 2023 be a happy year. Of much health, prosperity and above all things prosper our soul, our spirit and that we can grow in everything that is of benefit and good name. Always being willing to give a little of what we are blessed with, and keeping in mind that there is more profit in giving than receiving. Today I want to share with you this little work that I did and that can be a nice contribution to the community and is how to make a keychain with the initial of my name which is the letter Y. It is very simple to make and from this tutorial you can make other letters of the alphabet. | Saludos estimados amigos. Bendecido año nuevo para todos. El deseo de mi corazón es que este año 2023 sea un año venturoso. De mucha salud, prosperidad y que sobre todas las cosas prospere nuestra alma, nuestro espíritu y que podamos crecer en todo aquello que es de provecho y de buen nombre. Estando siempre dispuesto a dar todo un poco de aquello en lo que somos bendecidos, y teniendo presente que hay mayor provecho en dar que recibir. Hoy les quiero compartir este pequeño trabajo que realicé y que puede ser un bonito aporte a la comunidad y es como realizar un llavero con la inicial de mi nombre que es la letra Y. Es muy sencillo de realizar y a partir de este tutorial se pueden realizar otras letras del alfabeto. |
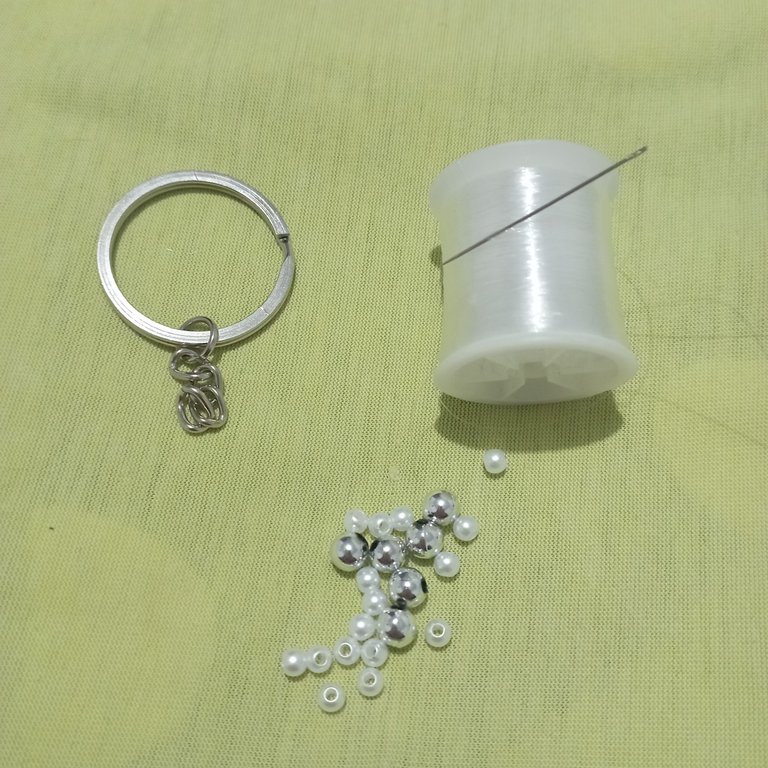
The materials used are:
18 beads of 3 millimeters.
7 silver plated 4 millimeters balls.
1 ring for key ring.
Nylon thread.
1 sewing needle.
Los materiales usados son:
18 perlas de 3 milímetros.
7 balines plateados de 4 milímetros.
1 aro para llavero.
Hilo de nylon.
1 aguja de coser.
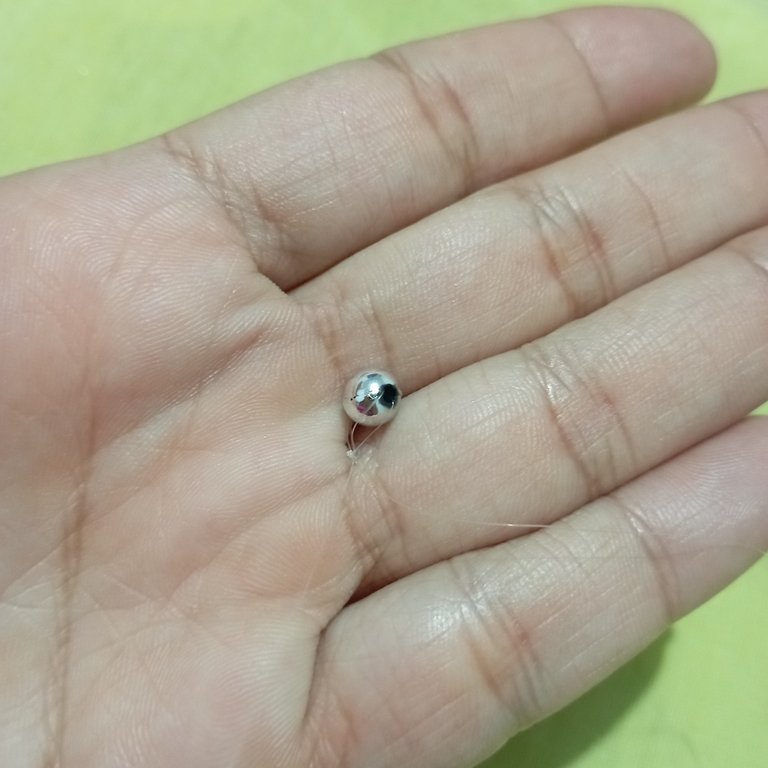
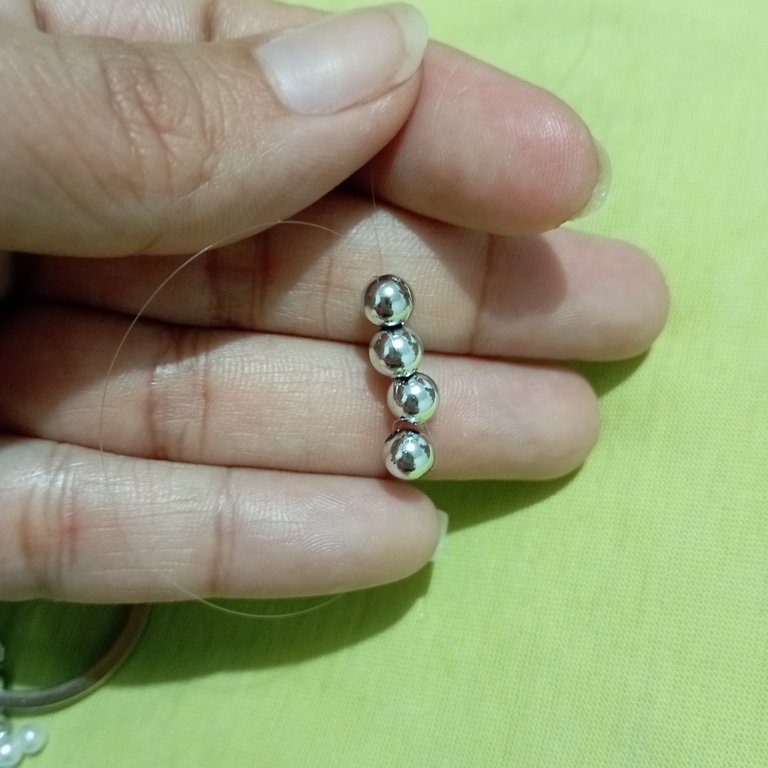
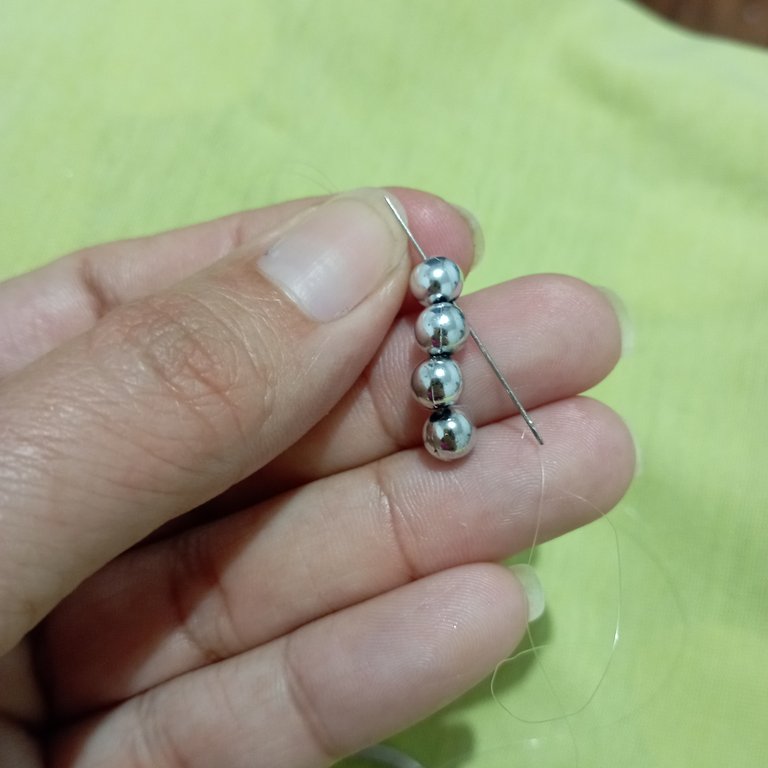
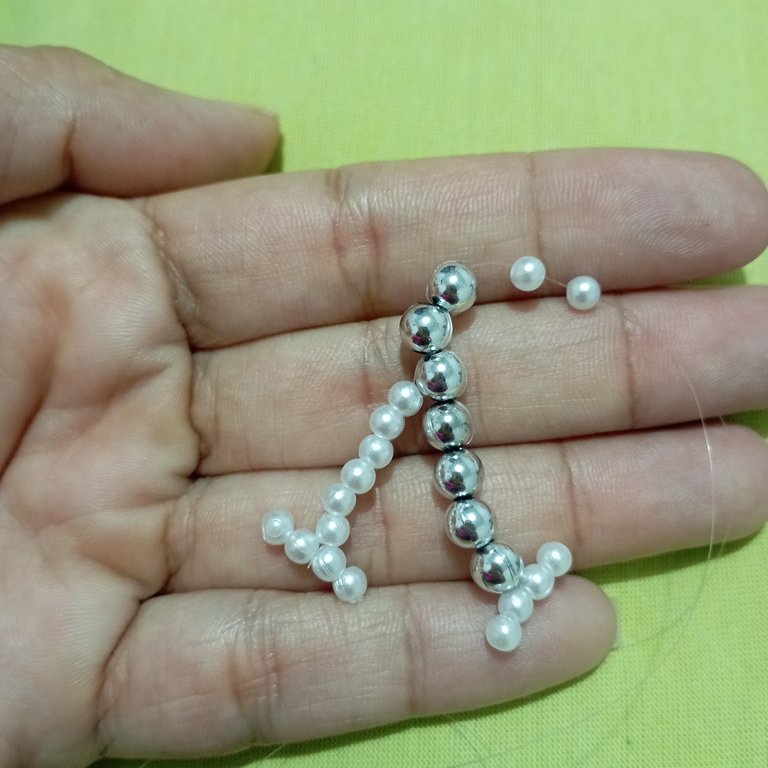
At the beginning we load the needle with about one meter of naylon thread. I would recommend using a heavier gauge naylon thread to give it a little more strength, but it would look even better with costume jewelry wire. We pass the needle through the hole of a ball and through the thread just as we would tie a lark's foot knot. This way of knotting is very important because it will prevent the work from falling apart, since the holes of the pellets are large and a small knot at the end of the naylon will not contain them. Then we pass three more beads and we will have a row of four, in the last bead of this row we pass the needle several times through the hole to make sure that they do not move. | Al empezar cargamos la aguja con un metro aproximadamente de hilo de naylon. Yo recomendaría usar un hilo de naylon de mayor calibre para que tenga un poco más de firmeza, pero quedaría aún mejor con alambre de bisutería. Pasamos la aguja por el orificio de un balín y por medio del hilo tal como se realizaremos un nudo alondra. Esta forma de anudar es de suma importancia porque evitará que se nos desarme el trabajo, ya que los orificios de los balines son grandes y un pequeño nudo al final del naylon no las contendrá. Luego pasamos tres balines más y tendremos una fila de cuatro, en el último balín de esta fila pasamos la aguja varias veces por el agujero para asegurarnos de que no se muevan. |

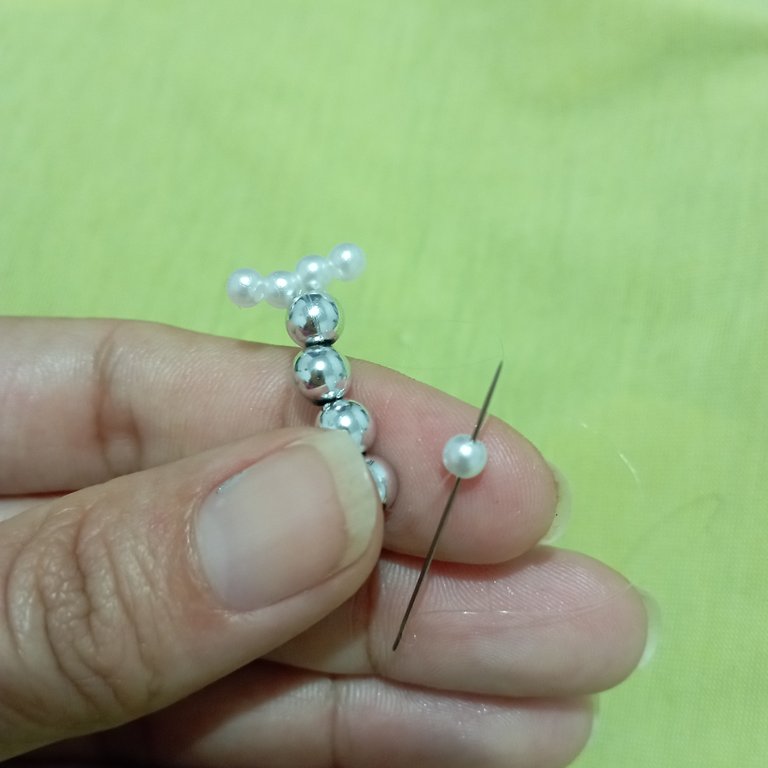
We introduce two beads and we orient them to one side, we do this by returning the needle over the last bead we introduce and we return the needle through the inside of the previous bead. We continue with two more beads and repeat the process but in the opposite direction. We will have a small T. | Introducimos dos perlas y las orientamos hacia un costado, esto lo hacemos retornando la aguja sobre la última perla que introducimos y regresamos la aguja por el interior de la perla anterior. Seguimos con dos perlas más y repetimos el proceso pero en sentido contrario. Nos quedará firmada una pequeña T. |
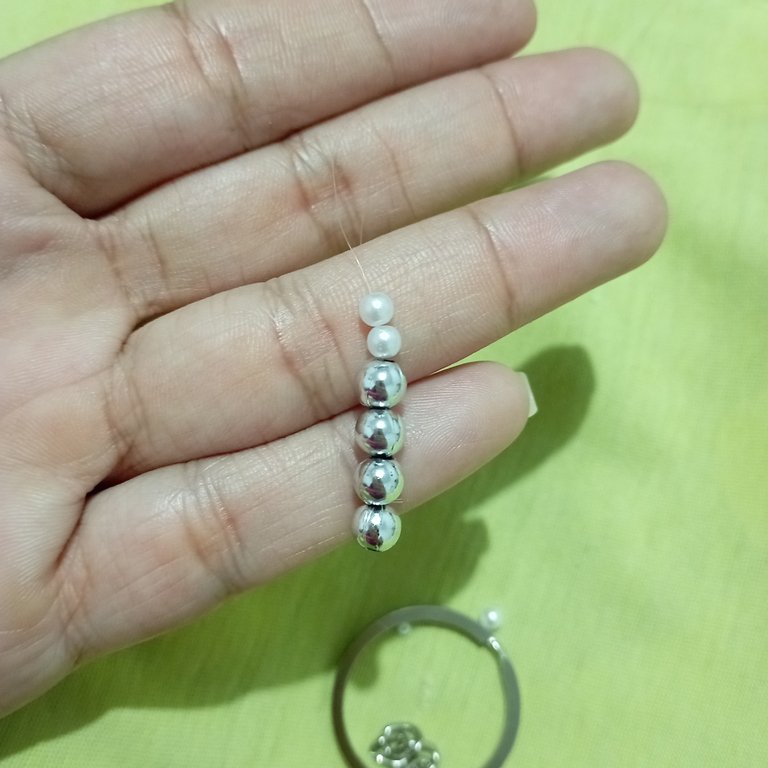


We pass the needle through the center of the beads and return to the starting point, there we place 6 beads and at the end of these we place two beads, we repeat the process of returning passing the needle through the previous bead and thus we give orientation to one side. We pass two more beads and make a T again but this time made all with beads. We return to the starting point passing the needle through the inside of the six aligned beads. | Pasamos la aguja por el centro de los balines y regresamos al punto de inicio, allí colocamos 6 perlas y al final de estas colocamos dos perlas, repetimos el proceso de regresar pasando la aguja por la perla anterior y así le damos orientación hacia un costado. Pasamos dos perlas más y hacemos nuevamente un T pero está vez hecha toda con perlas. Regresamos al punto de inicio pasando la aguja por el interior de las seis perlas alienadas. |
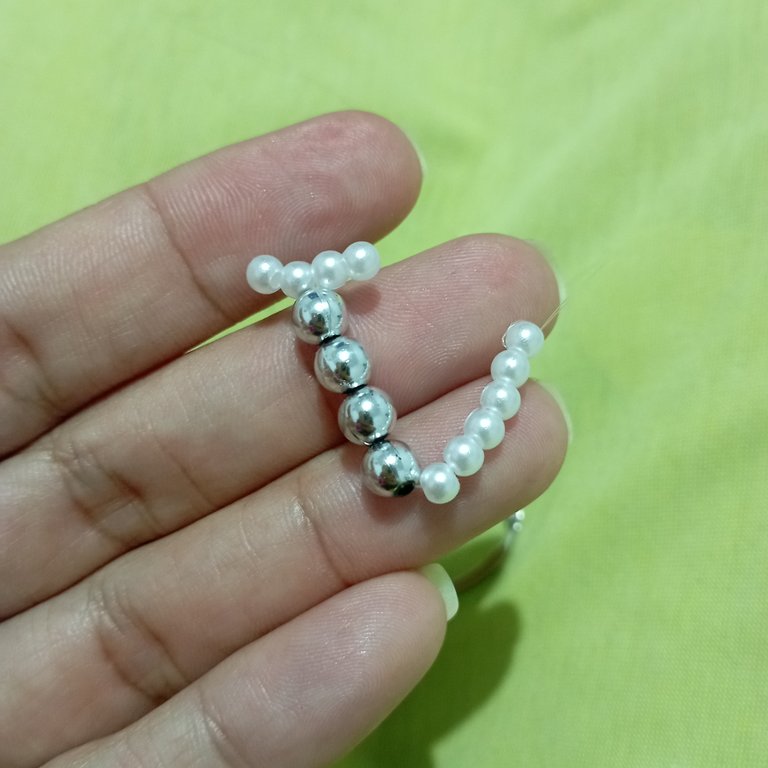
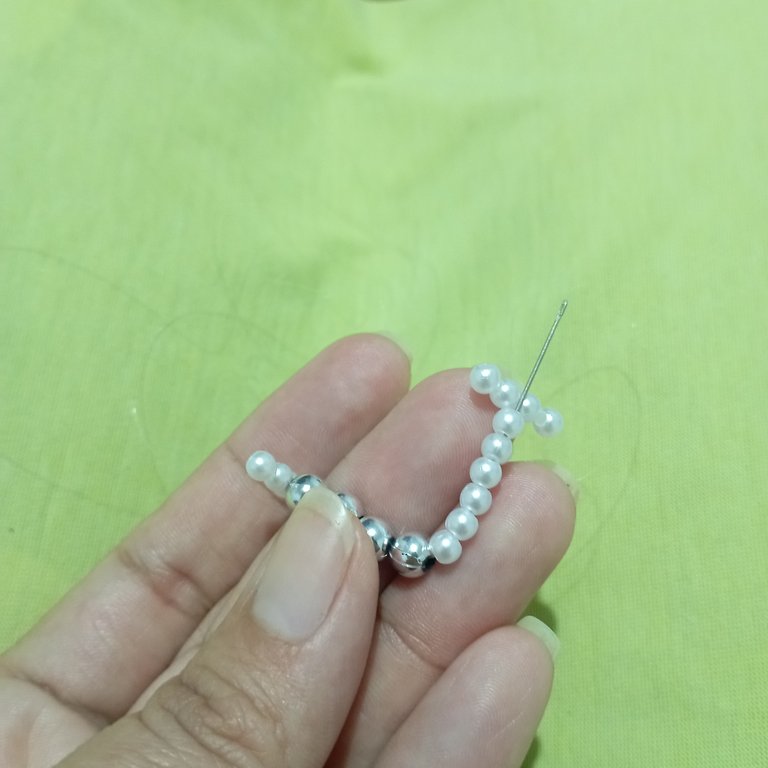
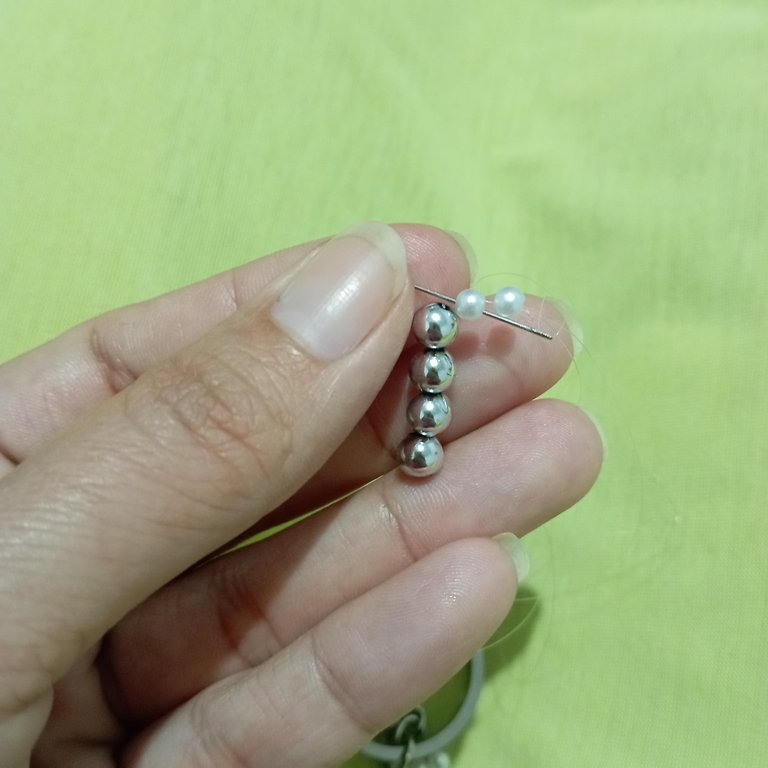
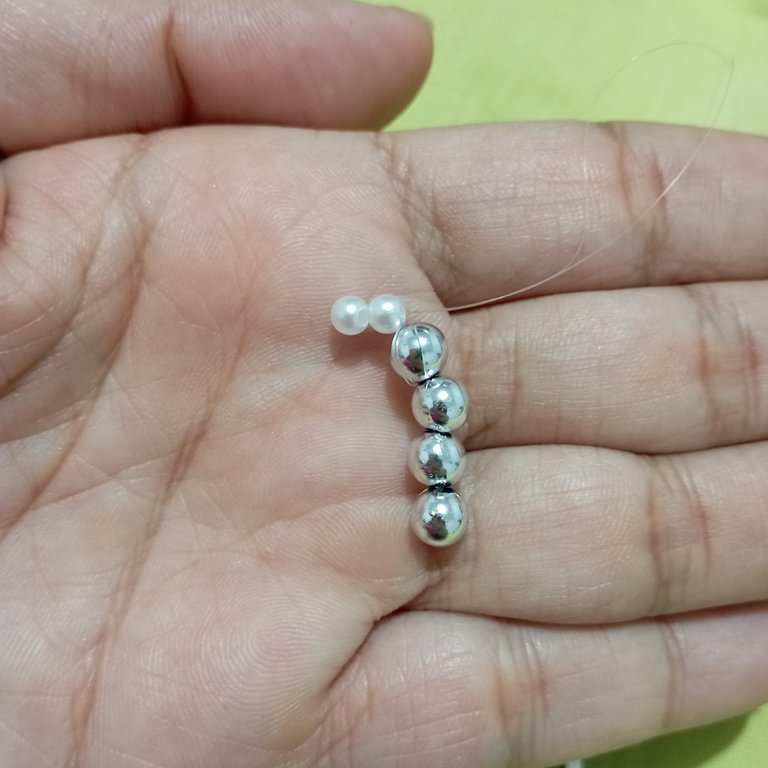
We start working the lower part of the letter Y. We pass the first bead and make a turn with the needle to fix it. This is always done on the first bead that we place and it serves as a fastener so that the following beads do not delaminate. We pass two more beads and perform the same procedure of the four beads to form a new inverted T that will be the base of the letter we have made. | Empezamos a trabajar la parte baja de la letra Y. Pasamos el primer balín y damos una vuelta con la aguja pasa fijarlo. Esto siempre lo hacemos sobre la primera cuenta que colocamos y nos sirve como sujetar para que no se delicen las siguientes. Pasamos dos balines más y realizamos el mismo procedimiento de las cuatro perlas para formar una nueva T invertida que será la base de la letra que hemos realizado. |


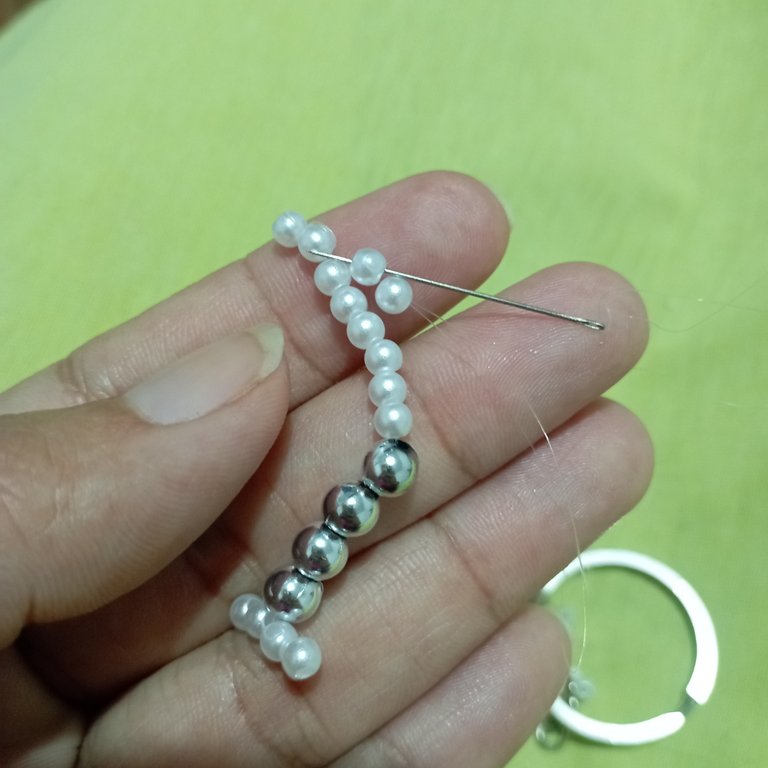
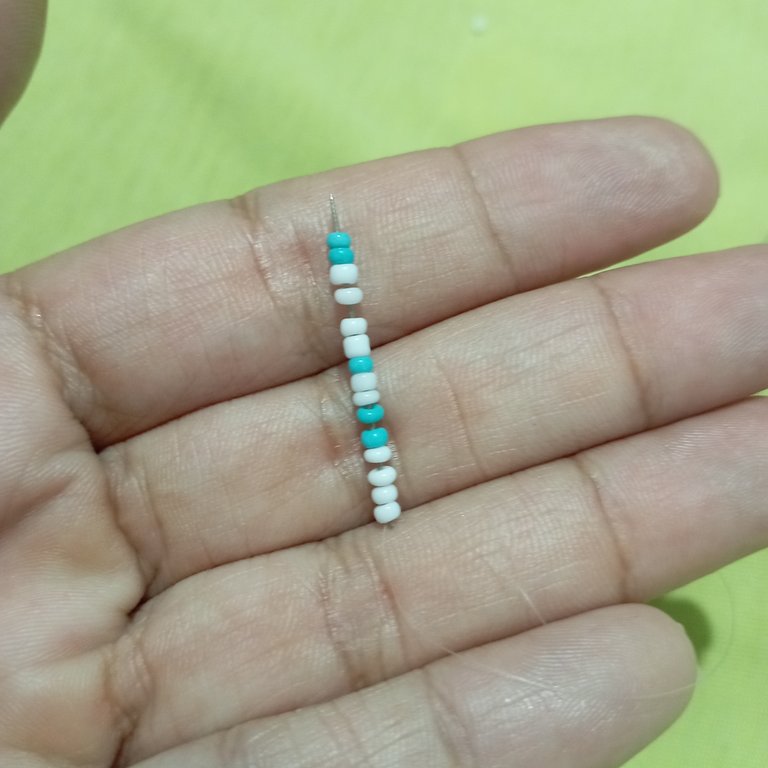
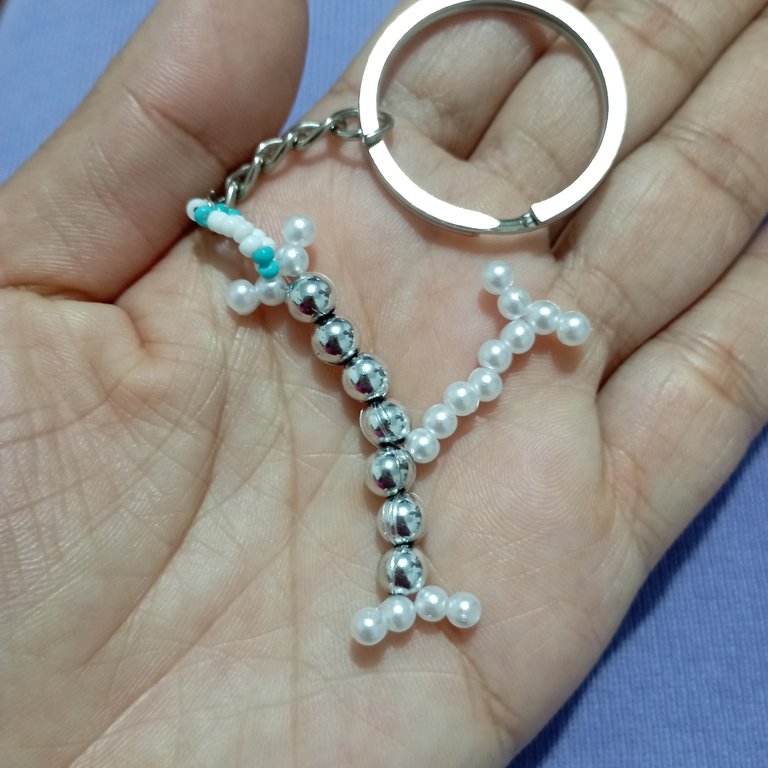
To make the keychain pendant we place 15 white and turquoise beads on a thread. Always passing the thread twice through the first bead to prevent the following beads from slipping out of the row. This is something I learned with practice because I always had the problem of how to prevent them from coming off the thread, so I make a lark's foot knot and problem solved. After all the beads are aligned we make a circle passing the needle through the first 7 beads and this way I have the ring that will be used to hang the metal ring keychain. | Para hacer el colgante del llavero colocamos 15 mostacillas de color blanco y turquesa en un hilo. Siempre haciendo pasar dos veces el hilo por la primera mostacilla para evitar que las siguientes se salgan de la hilera. Esto es algo que aprendí con la práctica porque siempre tenía el problema de como evitar que se salieran del hilo, entonces hago un nudo alondra y problema resuelto. Luego de alineadas todas las mostacillas hacemos un círculo pasando la aguja por las primeras 7 mostacillas y de está forma tengo el aro que me servirá para colgar el llavero de aro metálico. |

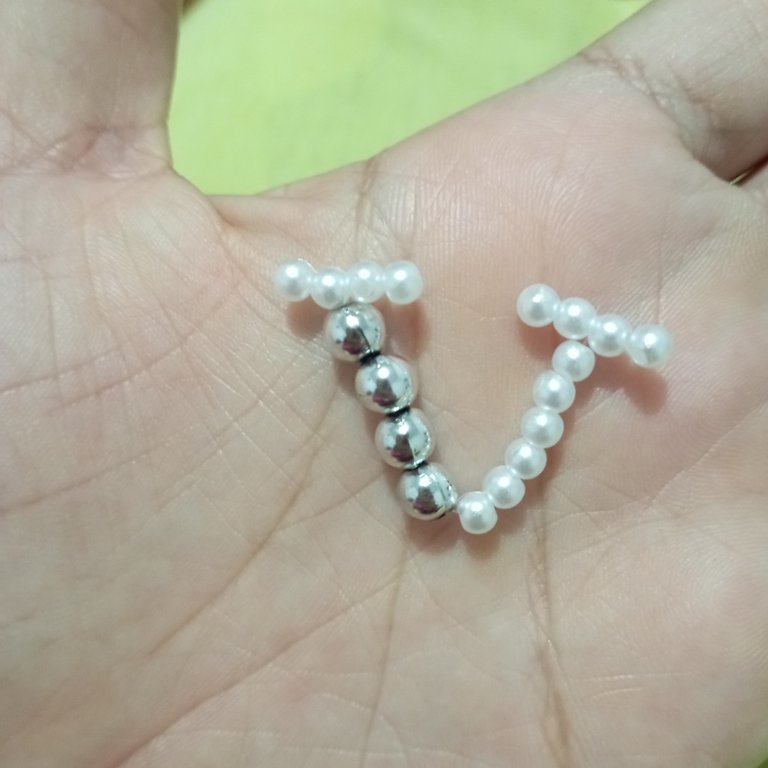
This keychain is the first one I make. I thought the result was very nice but I think it can be improved with bijouterie wire and other decorative details. I am waiting to get this alambra, because believe it or not I have not seen it where I live. Well, my dear friends, I hope with all my heart that you liked it. Bye Bye. | Este llavero es el primero que hago. Me pareció muy lindo el resultado pero pienso que se puede mejorar con alambre de bisutería y otros detalles decorativos. Estoy esperando conseguir este alambra, porque aunque no me crean no lo he visto por dónde vivo. Bien mis estimados amigos deseo de todo corazón que les haya gustado. Chao Chao. |
Imágenes editadas en: itshot
Fotos tomadas con Redmi 10
Images edited in: itshot
Photos taken with Redmi 10
0
0
0.000
¡Enhorabuena!
✅ Has hecho un buen trabajo, por lo cual tu publicación ha sido valorada y ha recibido el apoyo de parte de CHESS BROTHERS ♔ 💪
♟ Te invitamos a usar nuestra etiqueta #chessbrothers y a que aprendas más sobre nosotros.
♟♟ También puedes contactarnos en nuestro servidor de Discord y promocionar allí tus publicaciones.
♟♟♟ Considera unirte a nuestro trail de curación para que trabajemos en equipo y recibas recompensas automáticamente.
♞♟ Echa un vistazo a nuestra cuenta @chessbrotherspro para que te informes sobre el proceso de curación llevado a diario por nuestro equipo.
🏅 Si quieres obtener ganancias con tu delegacion de HP y apoyar a nuestro proyecto, te invitamos a unirte al plan Master Investor. Aquí puedes aprender cómo hacerlo.
Cordialmente
El equipo de CHESS BROTHERS
Hoola @artsugar 🤗 feliz año para ti también ✨☺️ me encantó tu idea del llavero en forma de letra, casualmente yo ya había pensado una idea parecida pero veo que se ve muy lindo y delicado, además que se le podría agregar algunos accesorios más para complementarlo. Te felicito por el trabajo que nos compartes amiga👏🏻👏🏻, un saludito!!!💕
Gracias amiga. Siii...queda lindo, pero ciertamente como tú lo dices quedaría aún mejor con otros accesorios. Otra cosa que también sería aún mejor es hacerlo con alambre de bisutería, le daría más firmeza. Sería genial ver tu letra E.
Gracias por comentar. También te deseo un bendecido año nuevo.
Abrazos.
Feliz año también para ti amiga, me encantó este llavero te quedó hermoso, y tú proceso lo hace ver muy fácil de elaborar, gracias por compartirlo con nosotros.
Así amiga. Realmente es muy sencillo de realizar. Y a partir de esta técnica se pueden realizar otras letras.
Gracias por comentar.
Te deseo un bendecido año.
Hola @artsugar. Felicidades te quedó muy bonito, lo intentaré hacer ya que nuestros nombres coinciden con la misma inicial. ¡Saludos!
Siiii...que bueno que te guste. Eso me alegra mucho. La letra Y es una de las más fáciles. Inténtalo y nos cuentas cómo te fue.
Gracias por comentar.
Bendiciones
Amiga @artsugar paso por aquí para desearte que tengas un bello año 2023 lleno de bendiciones infinitas y mil éxitos, colmados de salud, vida, properidad, paz, amor, felicidad, abundancia, toda la buena vibra y lo mejor del mundo.
Te quedó hermoso tu llavero 🤗😘🥰✨
Estoy inmensamente agradecida por tus bendiciones. Deseo que este año seas prosperada en todo y que el Altísimo te siga multiplicando en creatividad.
Abrazos.
Que bellas palabras amiga. Que los angeles digan amén 🙏🏻🙏🏻🙏🏻